Several years ago when I was in college, I used Matlab to study Machine Learning. I just would like to pick up Deep Learning again to catch up the AI trend. The first step is to set up the tools and environment. In this post I will share how to set up my Deep Learning environment with Anaconda and Jupyter Notebook, and then install TensorFlow.
Why Jupyter Notebook and Anaconda
Jupyter Notebook is not a pre-requisite for Deep Learning, but it is really helpful to create rich documents that contain live code, equations, visualizations and narrative text for your experiment. It is just like a white broad where you can put your idea on and continuously evolve the project code.
Anaconda a platform which can help you to create virtual environments and install packages needed for data science and deep learning. As you may know, version conflict is quite normal in Python/DL world because different Deep Learning frameworks may require different projects or packages. I tried with native Python and pip environment before, but it is really a nightmare for me. With virtual environments I can install specific package versions for a particular project or a tutorial without worrying about the annoying version conflicts.
Install Anaconda and Create Virtual Environment
Download Anaconda for your platform from here. Anaconda Distribution has Conda package manager and thousands packages integrated. After installation, I created a virtual environment as below:1
2
3
4
5
6
7
8
9
10
11
12
13
14
15
16
17
18
19
20
21
22
23# Update conda
(base) $ conda upgrade conda
(base) $ conda upgrade --all
# Create a new environment with Python 3.6
(base) $ conda create -n my-env python=3.6
# Switching or moving between environments is called activating the environment.
# Activate the environment. On Windows, use activate.
(base) $ activate my-env
# Take a look at the environments
(my-env) $ conda info --envs
(my-env) $ conda list
# Install a package with conda and verify it's installed
(my-env) $ conda install <package-name>
(my-env) $ conda list
# Install a package with pip and verify it's installed
(my-env) $ pip install <package-name>
(my-env) $ pip list
(my-env) $ conda list
For more details, check the document.
Setup Jupyter Notebook Kernels for Specific Environment.
A ‘kernel’ of Jupyter Notebook is a program that runs and introspects the user’s code. If you want to have multiple IPython kernels for different virtualenvs or conda environments in Jupyter, you will need to specify unique names for the kernelspecs.
Please note, the default kernel and python executable file of Jupyter is listed in base environment.1
2
3
4
5
6
7
8
9
10
11
12
13
14
15# Python in my-env
(my-env) $ python --version
Python 3.6.7 :: Anaconda, Inc.
# Python in base-env
(my-env) $ activate base
(base) $ python --version
Python 3.7.1
# Install IPython in my-env
(base) $ activate my-env
(my-env) conda install ipykernel # or pip install ipykernel
# Install the Kernel
(my-env) $ python -m ipykernel install --user --name py36-env --display-name "Python 3.6"
Start the Jupyter Notebook and you will find the new created kernel: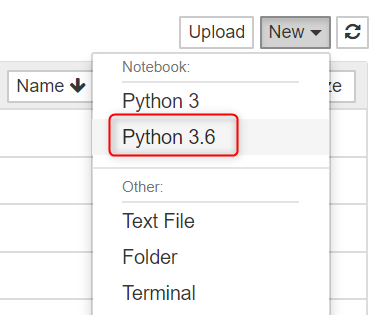
For more details, check the document.
Update: Use nb_conda Extension to Manage Kernels
nb_conda Provides Conda environment and package access extension from within Jupyter. This extension adds a Conda Packages item to the Kernel menu. Selecting this item displays the list of Conda packages in the environment associated with the running kernel, and the list of available packages. You can perform the same actions as in the Conda tab, but only against the current environment.1
2# Install nb_conda
conda install nb_conda
Install TensorFlow
We choose TensorFlow GPU support version. Follow the instruction to install the pre-requisites.1
2
3
4
5
6
7
8
9
10
11# Install tensorflow via pip
(my-env) $ pip install tensorflow-gpu
# Verify the installation
(my-env) $ python
Python 3.6.7 |Anaconda, Inc.| (default, Dec 10 2018, 20:35:02) [MSC v.1915 64 bit (AMD64)] on win32
Type "help", "copyright", "credits" or "license" for more information.
>>> import tensorflow as tf
>>> tf.__version__
'1.12.0'
>>>
Notes
1. Conda Install or Pip Install
Pip is focused around Python. It is a package manager that facilitates installation, upgrade, and uninstallation of python packages. But Conda is a packaging tool and installer for any software that aims to do more than what pip does; handle library dependencies outside of the Python packages as well as the Python packages themselves.
2. ModuleNotFound Error Troubleshooting
You may hit ModuleNotFoundError: No module named 'lightgbm' sometimes.
Check the sys.executable in Jupyter Notebook to verify the kernel path first: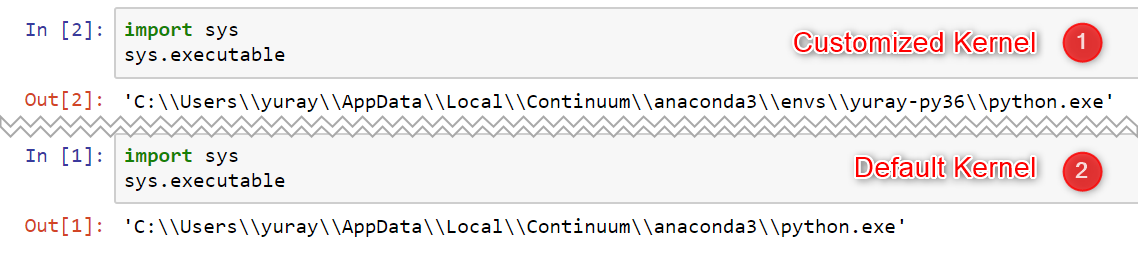
Or you can check the kernel spec via command jupyter kernelspec list.1
2
3
4(my-env) $ jupyter kernelspec list
Available kernels:
py36-env C:\Users\yuray\AppData\Roaming\jupyter\kernels\py36-env
python3 C:\Users\yuray\AppData\Local\Continuum\anaconda3\envs\py36-env\share\jupyter\kernels\python3
Then check the package installation status using conda list:1
2
3
4
5
6
7
8
9
10
11
12(my-env) $ conda list
# packages in environment at C:\Users\yuray\AppData\Local\Continuum\anaconda3\envs\py36-env:
#
# Name Version Build Channel
_tflow_select 2.1.0 gpu
absl-py 0.6.1 py36_0
absl-py 0.6.1 <pip>
astor 0.7.1 py36_0
backcall 0.1.0 py36_0
blas 1.0 mkl
ca-certificates 2018.03.07 0
...
Reference: